Kit Review – The Dragon on the Cloud

Back in 2011, Keith Newstead, Automata maker extraordinaire, announced that he was doing a paper kit for Evergreen International. In 2012, the kit became a series of paper automata, mostly new designs a few old ones as well as their wooden counterparts. I was on cloud 9, I love Keith’s work and have been building his kits for years. My excitement quickly faded when I found out that the Evergreen International was based in Taiwan and try as I might, I just couldn’t figure out away to get my hands on any here in the United States. Fast forward to 2014 and Evergreen finds European distributors to carry the kits outside of Asia. I still can’t find them online or anywhere I can buy them in the States. In early 2015 I finally find them for sale through a Canadian puzzle company and snatched all of them up. The wait was worth it, they are all fantastic but my favorite is still the first one that Keith announced all those years ago – the Dragon.

The Dragon on the Cloud Automata

The official name of the piece is “ModelShop Automata Collection – The Dragon on the Cloud”. Quite a mouth full for this deceptively simple machine, but like its long title it packs a whopper in its simplicity.

What You Get

The packaging is a stiff cardboard folder with a single sheet (folded) instructions and 8 sheets of diecut and scored sheets of paper. The packaging is all in Taiwanese (except for a few words) and the instructions come in Taiwanese and English.
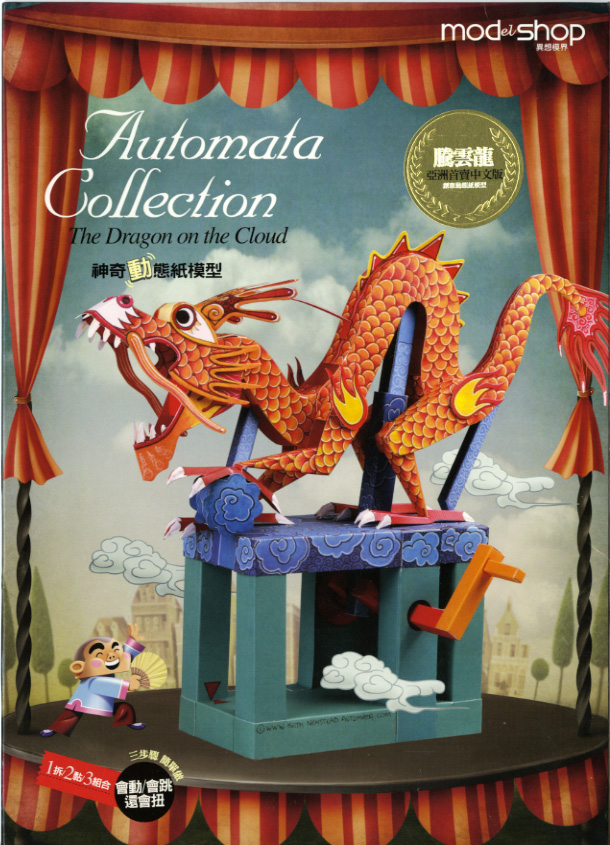
The Dragon on the Cloud Packaging

The Instructions

The instructions are great and easy to follow. Keith supplied his usual process drawings and it makes proper assembly a breeze.
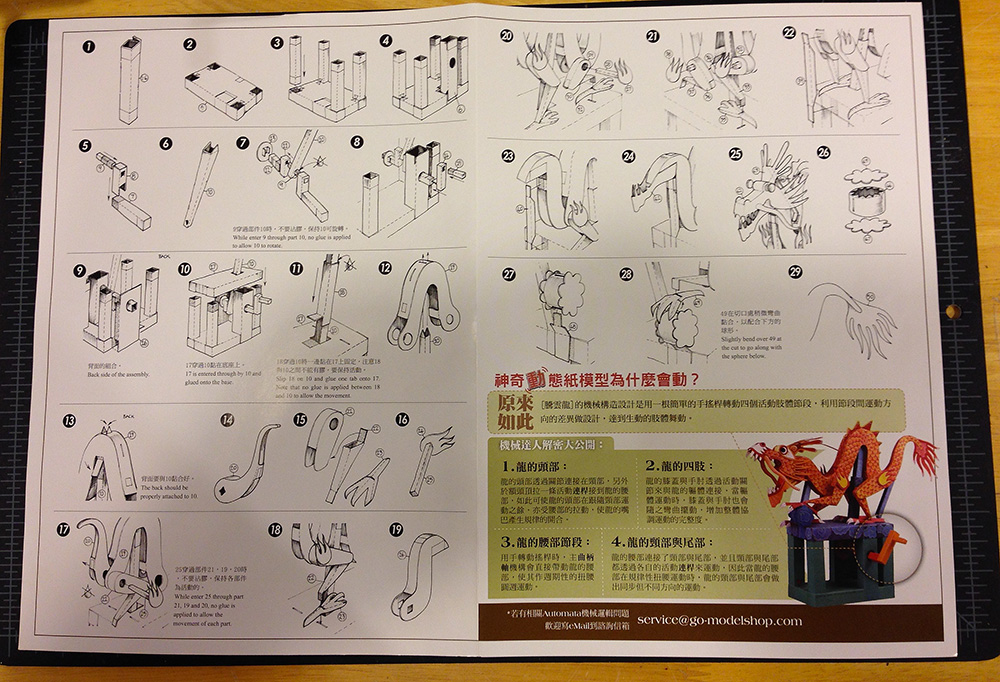
The Dragon on the Cloud Instruction sheet

The Paper

The paper quality is what makes or breaks a model. 90% of my gluing is done with white glue so how well that it glues the paper is my first concern. We’ll I’m happy to say that the paper is excellent, the die cuts were excellent and 100% on register. The paper is just right, sorta a satin finish between mat and glossy (more mat though). It takes glue fantastically but more importantly, it bends and curves wonderfully without creasing, very important in a kit like this with tons of curved parts.

Assembly

Assembly was fun, nothing too complex or hard to follow. This would be a great kit for yourself or to build with your kids. The total build time falls somewhere between 3 and 5 hours. There are some areas that you will need to slow down and be extra patient with:

  • The curves of the body will need some slow attention make look good.
  • The cloud and foot that attach to the base was the most difficult part to keep attached while the glue stuck. A little patience and you’ll be fine.
  • Attaching the shaft to the body is another area where a little patience is needed.
  • When inserting the base posts into the bottom base, make sure that the posts go all the way to the table top – don’t line them up with the white glue areas as this will affect when you glue on the top platform of the base.

The Mechanism

The automata is a single simple crank slider with 3 additional linkages. For such a simple mechanism (the same kind used in the common flying pig automata) the motion is incredible and very life-like. It feels like there are many more mechanics in work than there actually are. On mine the paper crank rubbing up against the base makes a delightfully unintentional squeaking noise as the dragon opens it mouth – priceless!

The Good

Its all good! The paper, the presentation, the instructions and the final model are all superb. The paper is a real stand out to me as being fantastic quality for a paper kit.

The Bad

There is one thing that I would change on this kit. I would have liked to see some sort of glue area or directional placement on the flames that are attached to the ends of the shoulder and hip shafts. Getting all four aligned with each other was a little tricky.

If you like kits, do yourself a favor and pick this one up. In North American you can get it from Puzzle Master Inc
Puzzle Master’s Automata
Heroes of Paper Automata – Tim Bullock

Time for another “Hero of Paper Automata”. This time its Tim Bullock.

Tim is my favorite paper automatist (is that even a word?) out there. He is owner and sole creator of “Cool 4 Cats”, an online paper automata store. Tim specializes in pushing the boundaries of what paper machines are capable of and his engineering is superb. Most papercraft uses similar construction techniques but Tim is always improving the way his pieces are constructed. You can tell that a lot of thought goes into is engineering and each piece he produces is an improvement on the last. Also almost all his pieces rely on different mechanisms, he vary rarely repeats himself (except for the conveyer belt that is the central mechanism in 3 of his pieces).

Tim’s pieces are also all about the narrative, and this is what sets him apart, each of his pieces tells a story and one that even draws pictures. A note on difficulty, in essence there are very few “hard” kits (although later on the blog I will be building the gear heart and the walking robot that do look like very difficult builds). Tim’s kits are not difficult to build, all it takes is time, patience and reading the instructions carefully. Construction, really is, cut out the piece and glue it together for almost all kits and even though they look complex, the Cool 4 Cats kits are no exception. A few of Tim’s kits are complex, I doubt a child would be able to build one on his own or would have the patience working with an adult to finish some of the more involved ones, but most of them are pleasant builds.

I’ve built around 80% of the kits he has produced and you won’t find kits as ingenious anywhere else. I’ll highlight some of my favorites:

The Artist
This kit is large (around a foot and a half long and just slightly less tall) and this is a challenging kit to build that will take quite a few hours. It does use a few rubber bands for tension and a pencil, so its not quite “100%” paper. The centerpiece of this kit is a large irregular double stacked disk which due to its size was a bit challenging to construct. The artist also has a table of art supplies that were a bit challenging but look amazing – the supplies are one of my favorite parts of the kit. As to not leave you in suspense, when you turn the handle the artist actually draws his model (although sans clothing). Its one of the most amazing machines ever made from paper.

The Wonderful Swimming Mermaid
And wonderful it is, her tail swishes back and forth in a very fluid manner. The mechanism turns out to be quite simple and elegant and once again the engineering is fantastic with a series of flat paper gears packed into place you wouldn’t think there were gears. I’ve never seen her tail swishing mechanism used in any other paper automata. For those of you offended by bare breasts, this kit comes with paper clam shells to cover her up with if you wish.

Feeding Time at the Zoo
This kit is an absolute delight to build and Tim’s best narrative piece. School children arrive at a zoo in a school bus. As they exit the bus the walk right into the awaiting jaws of a giant crocodile. My only complaint about this kit is that the method to open the crocodile’s mouth could have been better engineered – it still works just fine, it just doesn’t feel as well thought out as Tim’s other engineering.

The Dog’s Debate
This is another easy build and one of Tim’s two kits that has sound. Two dogs bark at each other – on large with a deep bark and the other small and yippy. The sound generator is very simple yet works to great effect.

I could keep gushing about his kits but its probably better if you go to his site and check them out for yourself.

Go to Tim Bullock’s Cool 4 Cats

Tim doesn’t offer any free kits or digital downloads on his site. All his kits are physical and must be mailed to you and they cost money. If you are hesitant about laying out real money on paper when you can just download some elsewhere for free, I will tell you again that these kits are special and well worth the cost.

Tools 101 – cutting things

I’m going to be doing a few papercraft basics posts for those of you out there that are interested in making automatas but have never done any papercrafting before. The tools, materials and techniques I’ll be using are just how I do it and should not be considered the only way or even the best way for you to work but considered it a starting point in your own explorations.

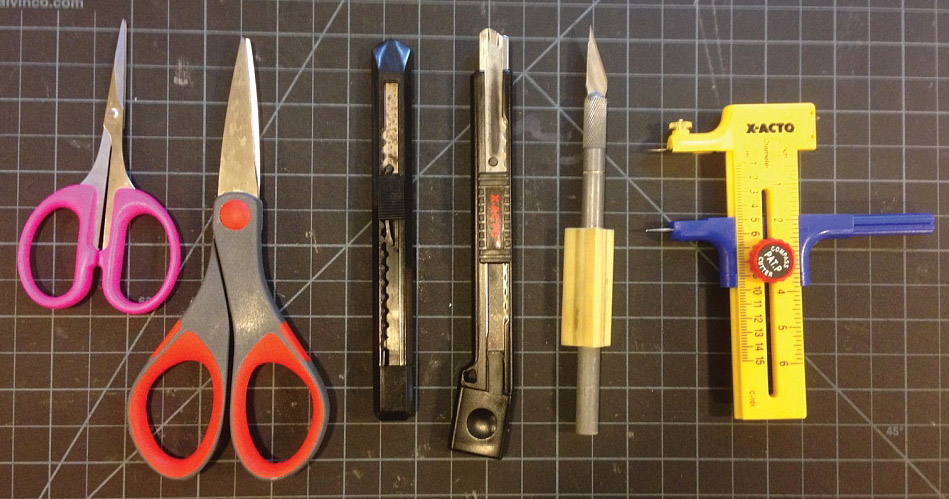
Making papercraft is pretty basic, it involves a design printed onto sheets of paper which are then cut out, folded and glued. I’m going over the tools I use to cut out the parts and their various advantages or short comings. My four main tools for cutting are: a pair of scissors, a utility knife with a snap-off blade, a x-acto knife and a compass cutter.

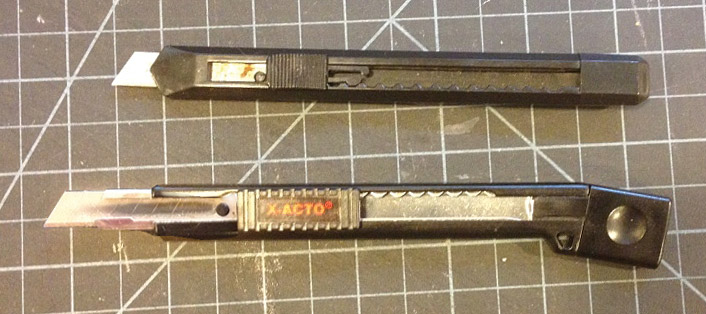
My cutting tools
My cutting tools

Scissors
This is the basic cutting tool everyone should know how to use. Scissors are versatile and easy to use and already found in most households. I use a pair of small craft scissors that I purchased from my local art store for around $2 (smaller pair). They have a short pointy blade. I also use a slightly larger pair if I have large pieces to cut.

Scissors
Scissors

Pros: Scissors are a common tool that are easy to find and easy to use. They are great if you are making papercraft with children because they are relatively safe to use. They are the best tool for cutting large curves and the quickest way to roughly remove parts from a sheet for finer cutting.

Cons: Scissors are terrible when dealing with concave curves, inset parts or slots (especially inset right angles) or super fine details like irregular edges or rows of triangular tabs.

Utility knife with a snap-off blade
This is my work horse of cutting tools. One of the most important things to consider when cutting is that your blade is always sharp. When I feel the blade is not cutting well or is leaving little snags, I can simply remove the blade’s end cap and snap off the end of the blade exposing a nice fresh sharp blade.

Utility knives with snap-off blades

Pros: Simple to use and it feels good in the hand. You can always and easily get a sharp blade. These blades are also super versatile for any cutting that you may need to do. They are difficult to cut yourself with (not impossible though – so be careful) and because the blade retracts they are safe and easy to store.

Cons: The blade is just over a 1/4 inch high, but even at this height it can still sometimes block visibility of what you are cutting especially in detailed areas or areas with a lot of cutbacks.

X-acto knife
A X-acto knife is  another type of utility knife that you can switch out the blade on. X-acto is the brand name of the most common of this kind of blade. The blades can be switched out to a variety of different shaped blades that all have special purposes. The most common blade is the #11, a long triangular blade that ends in a sharp point.

A X-acto knife
A X-acto knife

Pros: I find that x-actos are the best way to cut paper, especially fine or complicated details. Once you are comfortable using it, it is also faster than using scissors. Also just like the previous utility knife, in conjunction with a ruler it is the fastest and most accurate way to cut straight lines. Although with any of these tools you’ll get the knack of cutting pretty decent straight lines without a ruler.

Cons: These things are dangerous. Realize this and always treat them with caution and respect, they are NOT for children to use. I had a graphic design teacher in college that told us that when using x-actos its not if you will cut yourself but when. In addition, with the #11 blades the very, very tip of the blade has a tendency to break off leaving a tiny shard of sharp metal somewhere on your workspace.

Safety tip: When changing and disposing of any blade, wrap it in a piece of tape so some on picking it up or pushing down trash in the can does not cut themselves.

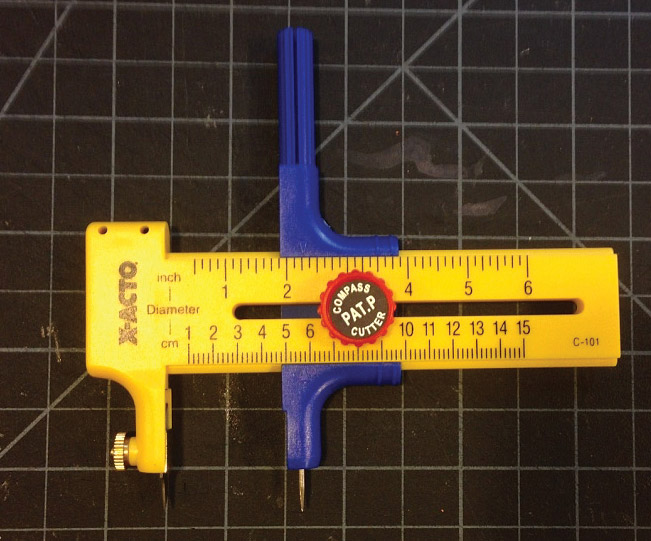
Compass cutter
This last tool is a specialty tool to cut circles, arches and holes. You can do these tasks with the other tools but a circle cutter does it easier and cleaner.

A compass cutter
A compass cutter

Pros: The best and cleanest way to cut circles and holes.

Cons: There are limitations to the size holes you can cut. This tools has limited uses.

Tip: Always rotate the compass cutter and not the paper you are trying to cut. there is a pin you push in at the center point of the circle that you are cutting and if you rotate the paper there is a good chance the you will tear the paper where the pin is stuck in and change the dimensions of the circle. I usually leave a little extra material on the part I’m about to cut and then I tape the part to my cutting board.

Heroes of Paper Automata – Johan Scherft

Every so often I will be highlighting an automata artist that has inspired me, whose work I feel is fantastic and that you should know about them too. My first inspiration, my “hero of paper automata” is a fine arts painter and paper crafter from the Netherlands by the name of Johan Scherft.

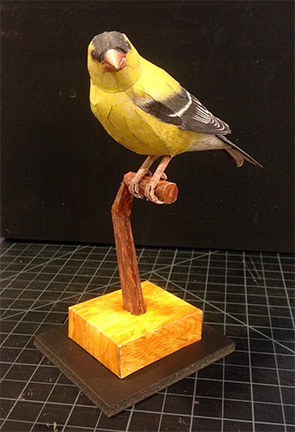
I didn’t discover Johan for his automata work, I first found out about him for his unbelievably realistic birds made from paper. He starts with some basic 3D forms in the computer and then finesses the heck out of them by hand. When the forms are perfect, he hand paints the entire thing in highly detailed watercolors. His animals are masterpieces, both artistically and technically. I do have some first hand knowledge of his work, I’ve purchased a bird and a dinosaur download from his site as well as his paper bird box set. His site has some free downloads too if you want to try building one of his creations. His automatas are not available in kit form (he does have an awesome free hatching dinosaur finger puppet, which is not technically an automata, it still moves).

Papercraft Goldfinch
Johan’s Goldfinch which I constructed.

Johan automatas are not strictly paper automatas, the main focus of the automata is an animal of some sort that is lovingly detailed out of paper but all his mechanisms are wood, metal and so on. He also makes fantastic use of magnets and mirrors too. Irregardless, Johan pushes the boundaries of what paper automata can be, making creations in paper that I have not seen surpassed in terms of realism.

Please check out his site at the link below.
Johan Scherft’s paper automatas
The link takes you right to his moving animal section but do yourself a favor and check out his whole site – if you are a paper crafter it is a real treat!

And so it begins…

Well, here we go. This is my first post of my first blog.

I am fascinated by paper models, the act of taking some sheets of paper, a blade and some glue and creating a 3D form seems like magic to me. The act of taking some paper, a blade and some glue and creating something that moves, comes to life under your control seems nothing short of miraculous. I know I’m using simple time tested mechanism and in reality I’m just demonstrating simple mechanics but that does not take away any of the wonder. This is where the title “Living Papercraft: a paper automata blog” comes from.

I am obsessed with paper automata, I’ve been building them off and on for years and now I’m making my own. I want to share this journey and highlight these delightful creations so that they can bring as much joy to others as they have to me.

I’m going to try to post weekly, as for content I want to:
How-to’s on paper model building
Show build ups of kits in progress
Review paper automata kits
Interview paper automata makers
Talk about mechanisms in paper
Go over the design process for my own creations

So, come join me on this voyage and welcome aboard.

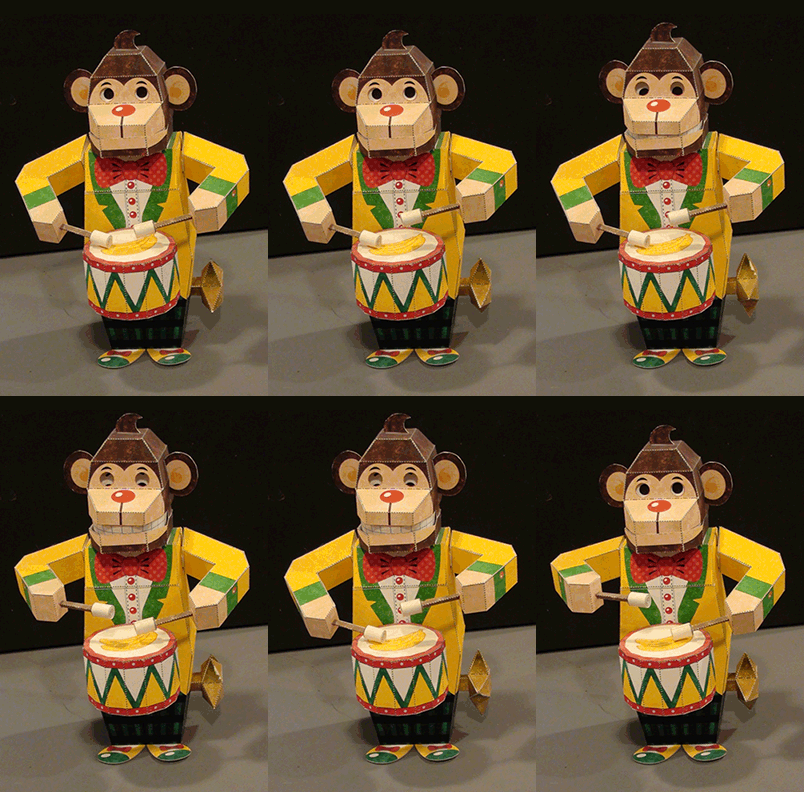
MonkeyDrummerAutomata
A sample paper automata – Canon’s Drumming Monkey